

How To Make A Fabric Window Cornice
If lighting is the jewelry of a habitation, then window treatments surely are the shoes! I mean, you lot need them! Learn how to brand an easy DIY window cornice for your home in but an afternoon!
This post contains chapter links. Please see my full disclosure policy for more details.
Ok, and then you lot don't actually need them, but your naked windows will thank you for it. I have a pretty hard and fast dominion when it comes to windows, and it's pretty simple. Do you wanna know what it is?
Dress them upwardly!
Seriously though, windows can exist a focal bespeak of any home, and a nifty accessory. So you should show them off. A well-dressed window can make or pause a room design.
I do have 2 exceptions where I'one thousand willing to pause my ain dominion though.
- Blackness aluminum windows. All the middle eyes here guys, and on my wish listing for a someday build.

Gahhhh. These babies should not be hidden! They are an architectural detail to be showcased. But for the residuum of united states of america who are simply trying to honey our ho-hum builder grade vinyl windows, nosotros need to clothes them up!
2. Contemporary Modern Windows. These sleek fashionable designs take a less is more than arroyo. And in this case I would opt for a minimalist shade for lite filtering merely.

Ok, then I've told yous why you need to clothes them up, but I haven't shared how.
A super easy and cheap mode is to make your own custom window cornice. Now, I'm not reinventing the wheel here with this tutorial. Simply this is a very simple way to give your dwelling house a custom wow factor and flex your DIY skills in the process.

Full disclaimer…
This is Non my first endeavour at making a window cornice. I once tried this project a few years ago using Styrofoam.
What was supposed to be a quick and fun DIY project escalated into an hour long cleaning session. It was anything BUT fun. Every step in my kitchen left me with covered in tiny white particles that seemed to outsmart even the all-time DYSON vacuum.
Lucky for me though, I overcame my power tool phobia and whipped out quite a few cornices with my new method in this post.

Beneath is a list of tools and linked supplies that y'all tin can easily purchase for your project.
*If using power tools isn't your gig, and then no worries. As long as yous accept your measurements, the awesome guys at Lowes or Dwelling house Depot can brand the cuts for you.
DIY Cornice Supplies
- Miter Saw
- Drill
- Staple Gun
- Wood screws (10)
- Plywood or pine lath
- Fabric of your option. I used this one here
- Polyfill batting
- D rings (2)
Run into, pretty simple so far right? Stay with me 😉
Step one – Measure for your window cornice
- Outset, measure out the width of your window, including whatsoever casing or trim work. Y'all want the width of your cornice to extend at to the lowest degree two inches outside the farthest indicate on each side.
- Next, take that length and add an additional 8.5 inches to it. This viii.5 inch section will get cutting down into 4 sections your return pieces (sides of cornice) and brackets.
- Finally, determine how tall yous want your cornice to be. I opted for 12 inches on my smaller windows, but yous can definitely make a argument on a larger window and go taller.
*Many pino boards already come in 12 inch heights and are a great option for this project if you're looking to reduce the amount of cuts y'all have to brand.
Step 2 – Choose your material
This is where information technology gets fun! I recommend textile shopping in person so that you can feel the weight of a material. You'll want to cull a heavier upholstery cloth, so stay away from anything too thin.
This neutral striped material was perfect for our new playroom blueprint.
You'll thank me when you become to cover your cornice, considering upholstery fabrics lay nicer and tend not to wrinkle during the assembly process.
Here are some home décor fabric ideas to get your inspiration flowing

Step 3 – Select your woods & make your cuts
Wood
For my project I used a elementary plywood lath like this 1 hither. Information technology'south a pretty big board then I had the guys at the Habitation Depot cut it down into strips for the peak I needed. Since my windows are a pretty standard size, I chose to go 12 inches tall.
I ended up walking out of the shop with 3 long boards, which was more than plenty to make quite a few cornices. (Which I ended up doing…hey, when you're on a roll, correct?)
If you have smaller windows though, you can probably get away with using a standard 12 inch tall pine board like this one here.
Make your cuts
Adjacent, you lot're going to make your cuts for the width of the cornice. Now, for those of you who are pumped upward to utilize a miter saw, go go information technology daughter. Just retrieve to add an additional viii.v inches to cut your return pieces and bracket sections.
To recap, you're going to have your long broad board and make your first cut for the platonic width of your cornice and the remaining four cuts as shown below for your returns (side pieces) and brackets.

If you don't have a saw, or you're hesitant to employ power tools, no worries. As long equally you requite the folks at Home Depot your measurements they ordinarily take no problem making a few quick cuts for you. Just don't go overboard and ask them to cutting xx pieces. They might not similar yous all that much.
Step iv – Assemble your window cornice
Now you're ready to put this bad boy together. Get together your cornice board, ii return pieces, screws and drill.
- Drill 3 pilot holes downward each side of the cornice as shown below. This will make it easier to join your forest pieces together without it splitting.

- Line your render piece up to adhere it to your cornice and begin screwing them together with your drill.

- Repeat these steps for both sides and y'all should have the frame of your cornice looking something like mine hither:

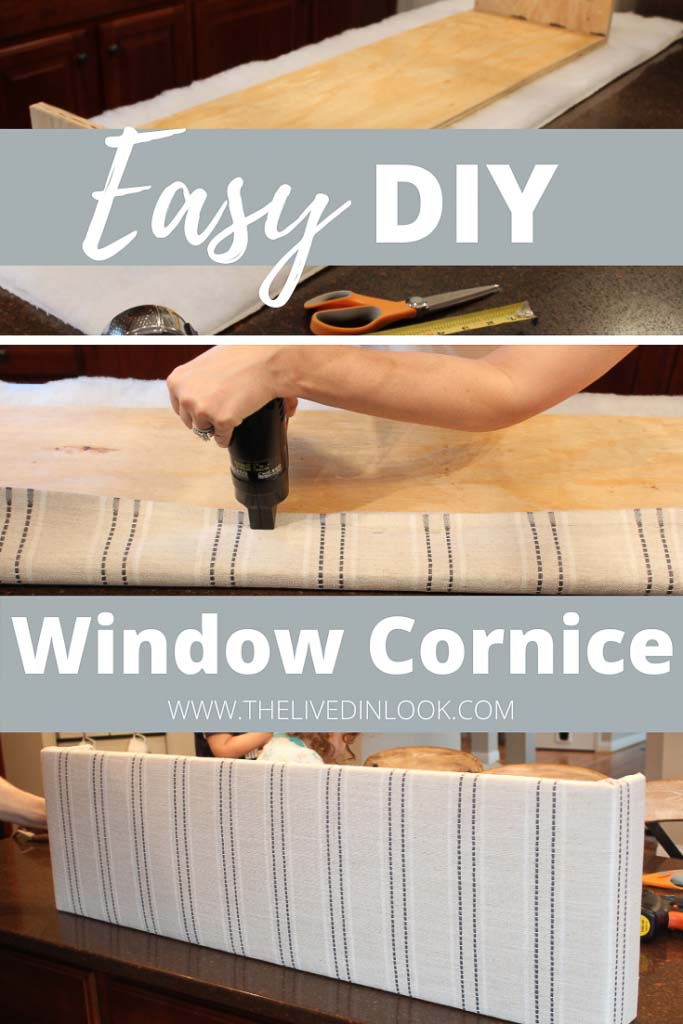
Step 5 – Cover it
Next, you'll cut your fabric and batting to size, leaving enough overlap to wrap and cover your cornice board around all the edges. Layer your cloth confront down on a flat surface with your batting on top. Make certain all edges are pulled tightly so that the material isn't wrinkled underneath and brainstorm wrapping.

I hate to tell y'all this, only if y'all're not a fan of wrapping presents then you'll need to muster up some patience for this stride.
Wrapping the cornice is sort of an art, just it actually isn't all that hard. Just begin in the eye, wrap the meridian, secure with your staple gun and then repeat with the bottom department. Call back to proceed the fabric pulled tightly to foreclose any wrinkling.
The back will not look pretty, mine certainly didn't here, but the front end should exist nice and secure!


Step half dozen – Attach your brackets
Finally, you're almost there!
Grab your ii remaining wood pieces for the brackets and adhere each one to the insides of the cornice returns. No demand for any airplane pilot holes on this step, and if it's covering any cloth and batting it should even so attach merely fine.

Step 7 – Adhere your D-rings & install your window cornice!
Lastly you're ready to attach each of your D-rings to the tops of your brackets every bit shown below.
This will be your mounting hardware to hang the cornice on the wall. I beloved this choice because it makes the cornice removable in case you decide to pigment your walls or reupholster it later downwards the road.

See, that wasn't so hard at present was it? I hope this mail gives y'all the tools you need to tackle an like shooting fish in a barrel DIY projection that will make a whole lot of bear on and assist you love the home you have!


This was such an like shooting fish in a barrel project that added a custom impact to our playroom makeover.
Have you ever tried to make your own window cornices? I'd love to know what method you used so drop me a comment below and don't forget to subscribe to my weekly newsletter to get all of y best DIY tips delivered straight to your inbox.
pin this project for later

Source: https://thelivedinlook.com/easy-diy-window-cornice-you-need-to-make-now/
Posted by: mckellarwarried.blogspot.com
0 Response to "How To Make A Fabric Window Cornice"
Post a Comment