

How To Clean Up Edges On Photoshop
Attempt these techniques to make better, more natural selections, so you tin can isolate subjects in an image with a polish edge.
Making selections is the starting time step in using Photoshop to isolate subjects and parts of images. Compositing, or making a new image by combining two or more than images, is one of the foundations of the plan.
After making selections, refining the edges prepares for smooth isolation. In this guide, we will become over straightforward, unproblematic methods to help you get the best selections possible.
Making Selections
For this guide, nosotros'll utilize the Magic Wand and Lasso to show just how skilful these seemingly basic tools can exist. I chose an image that looks to be a nightmare to separate from the background. But, by combining the tools it's really quite uncomplicated.

i. Use the Magic Wand to Define the Chief Boundaries
Select the Magic Wand from the Tools window. At the height of the app window you lot'll come across a field that says Tolerance and enter 20. At present merely click in the groundwork (the area you want to remove) near the subject to separate them.

Concord Shift and go on clicking up and effectually each shift in color, concentrating your clicks where the subject meets the groundwork. If the choice runs into the subject, hold Selection and click that area to deselect it, co-ordinate to the Tolerance value.

If you find the wand tedious or conversely also hungry, adjust the Tolerance. Modify the number past 10, up or down, until you find the sweet spot for the particular area. If you're finding yourself in single digit adjustments, bond out and come back to it in the next footstep.
2. Refine the Option with the Lasso
Where y'all found the Magic Wand not entirely connecting in the background, we'll use the Lasso to grab that area manually.
Hold Shift, to add together to the live selection, and draw the area adjacent to the discipline. This lets you fine tune specific areas and put more space between the subject and the background.

Property Shift, just Lasso the remaining background by using large sweeping strokes. When you take collected all the devious pixels, and the "marching ants" selection is reasonably tight confronting the subject, hitting Command + Shift + I to Select Inverse. This will flip the selection, making the subject the live pick, instead of the background.

Use Select and Mask to Smooth
Here'due south the good stuff. With the selection still live and either the Magic Wand or Lasso tools active, click the Select and Mask button at the tiptop of the app window, or hit Command + Option + R like a pro.

1. Global Refinements
The Global Refinements section along the right side of the window allows you to brand incremental adjustments to specific attributes, until the desired changes are achieved.
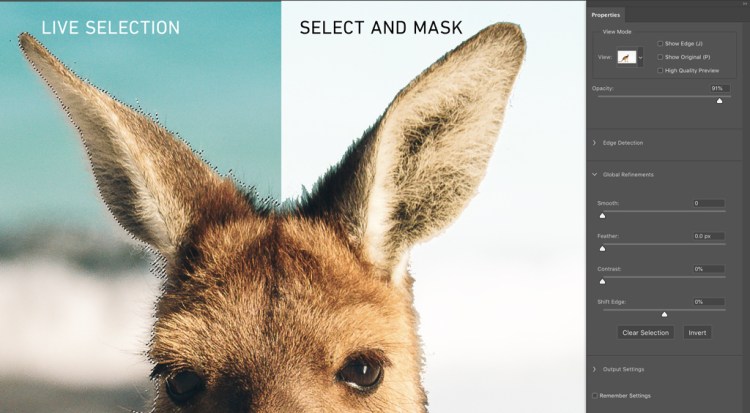
To begin refining the selection, start with these settings:
- Smooth: 3 – rounds over whatsoever jagged parts, giving the selection a smoothed purlieus.
- Plume: 0.5 px – softens, or feathers, the edge of the selection.
- Contrast: 0 – used more than for inorganic shapes, when the selection needs help with a color or contrast transition.
- Shift Border: -20% – brings the boundary, along with the other Global Refinement parameters, inwards or outward some, to adjust the size of the overall choice.

2. Border Detection
On an image like this, when there are lots of undulations, and light coming through fur against a background, nosotros tin can use the Edge Detection controls, above Global Refinements, to meet if Photoshop can better define those areas.
Under Edge Detection are just ii controls: a Radius slider and a Smart Radius check box. We want to keep these as low as possible to maintain control of the results, and increase slowly. Start with the slider set to 1, and leave Smart Radius unchecked.

The results of this i-pixel change may be all yous need. If non, have the Radius up a pixel at a time and check around the edges of the selection to see if the results are good. I went up to 5 and found that it treats the fur a little better in this situation.

3. Refine Edge Brush Tool
To really become a smooth refined border in some hairy situations, utilize the Refine Edge Brush Tool. A long name for a elementary but powerful tool in Select and Mask, this castor makes child'due south play of pilus, fur, and anything fuzzy.
Find the little tools window in the upper left of the window. The 2d tool down is the Refine Border Brush. Select it and find an expanse of fur to define.
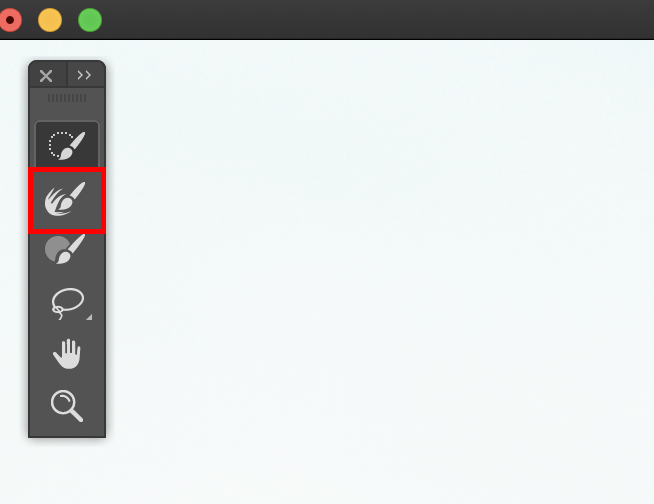
Change the size by hitting the open up bracket key [ to reduce, or close bracket central ] to enlarge. As usual, start small. Now, click and drag the brush through small sections of hair/fur at a fourth dimension and allow it to do its thing.

You'll quickly see that this tool is the closest affair to magic we have at this point in man history. Use information technology judiciously and you'll be able to have your craggy, sloppy selection to new heights in field of study isolation.

To epitomize, here are suggested uses for the Select and Mask tools:
- Global Refinements to smooth the overall selection.
- Border Detection to let Photoshop discover and create a transition.
- Edge Refinement Brush to pinpoint areas where hair, specifically, blends with the background.
With this combination of controls and tools, you'll never see another paradigm you can't dissect once again. Between the quick manual work and the automatic controls, you have all you should need to brand shine selections like a pro.

Or practice they. . .

Looking for more than photoshop tips and tutorials? Check these out.
- 5 Like shooting fish in a barrel Ways to Brand Better Selections in Photoshop
- Photoshop Nuts: Learn How to Use Layers in Your Designs
- How to Make a Background Transparent in Photoshop
- Halftoning 101: How to Halftone Images in Photoshop
- Why the New Photoshop Content-Aware Fill Is Insanely Powerful

Source: https://www.shutterstock.com/blog/how-to-smooth-edges-photoshop
Posted by: mckellarwarried.blogspot.com
0 Response to "How To Clean Up Edges On Photoshop"
Post a Comment